
Substance painter decal projection
What is a decal projection
Decal projecting is a method of applying decal textures to surfaces in Substance Painter. The decal is applied like a stencil through using of the Projection tool.
Why use it?
Using the projection method to paint decals can achieve higher quality and more controlled results as opposed to painting them directly as an alpha. There are less limitations when using projection over direct painting including decal size and application amount. This means only parts of a decal texture can be painted if desired. This is particularly useful when multiple decals are on the same texture.
Projection also allows different alphas to be used when painting the decal which can result in interesting and unique applications. Projecting with tiling is also possible meaning the decal will repeat in a grid formation.
Preparing Decals
To ensure only the decal is affected by the material properties when painted, it should be converted to a multi-channel decal prior to painting. This requires the decal image to be duplicated and edited to create different maps for each channel. Below is the process to create these maps in Adobe Photoshop:
Open decal in Photoshop > create folders for Base Colour, Height, Roughness, Metallic, and Normal maps > duplicate decal layer into each folder > adjustments on each decal layer:

Base colour
Height
Roughness
Metallic
Normal
Export each folder as a PNG.
Leave untouched
Image > Adjustments > Levels > Output Levels: 128 (grey)
Image > Adjustments > Levels > Output Levels: 255 (white)
Image > Adjustments > Levels > Output Levels: 0 (black)
Edit > Fill > Contents: Colour > R: 128, G: 128, B: 255 (#8080ff) > Preserve Transparency
Begin with importing the newly created textures to Substance Painter:
File > Import resources > Add resources > undefined > texture > Import resources to: project > Import.
Once imported ensure the texture sets are baked and proceed to add a blank paint layer.
Select the Projection tool and scroll down to the material properties, ensuring all channels are active. Drag each decal map into the appropriate channel. Select a desired alpha to begin painting.
The projected stencil can be scaled [S + Right Click], rotated [S + Left Click] and moved [S + Middle Mouse] as needed. A tip when applying decals is to work in Orthographic view [F6] for more accurate results.

Levels
Adding a Levels effect to the decal paint layer allows the control of channel values. Changing the black and white levels of an affected channel will change the properties of the painted decal the same way it would a material.

Masking
Use black and white masks to avoid accidental or unwanted application to other surfaces. It is good practice to always use masks when applying decals.

Blending modes
Painted decals will inherit the detail present on the applied surface. This means if there are imperfections painted on the material before the decal is applied, the decal will also feature those imperfections (in some cases this would be desired). However, to avoid this each channel’s blend mode of the decal paint layer needs to be set to Normal.

Additional tips
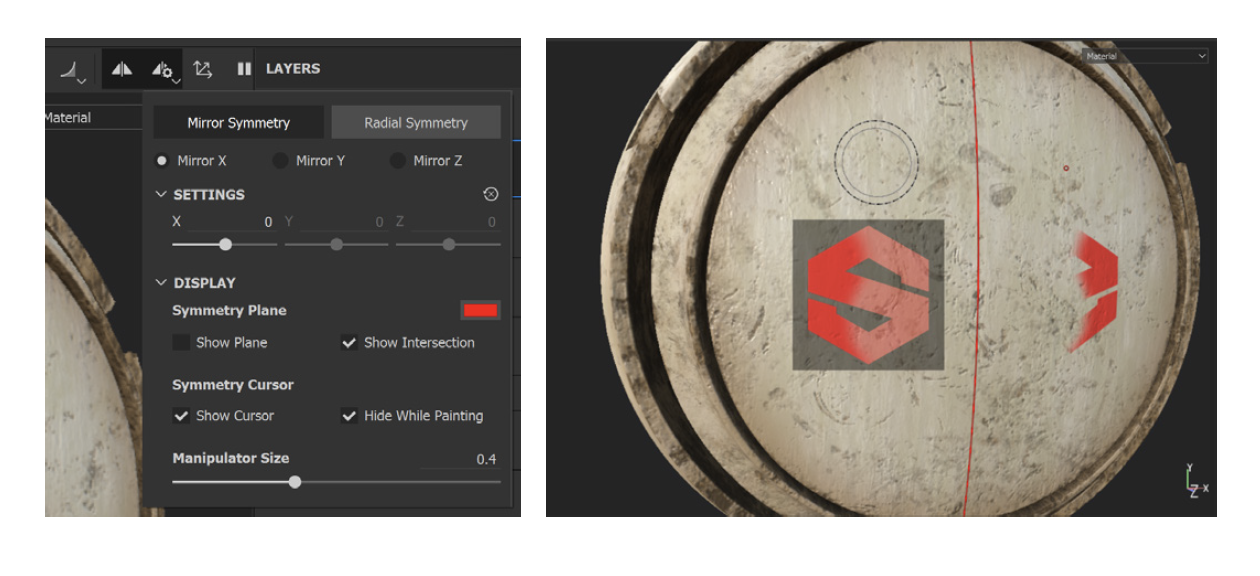
Using the Symmetry feature when applying decals can be useful if mirrored decals are needed. Various settings can be adjusted when symmetry is toggled such as the axis of symmetry and it is even possible to produce radial symmetry results.
Thanks for reading!
Damian Noviello
BMW Group + QUT Design Academy Intern 2020